Microphones are everywhere around us – from concerts and podcasts to classrooms and studios. But have you ever wondered what’s inside a microphone and how each part works to capture sound? In this article, we’ll take a closer look at all the main anatomy of a microphone with a labeled diagram, explain their functions in simple terms, and help you understand how this amazing device turns sound into audio signals. Whether you’re a beginner or just curious, this guide makes it easy to learn.
List of Microphone Parts With Names
- Capsule
- Transformer
- Electrical Leads
- XLR Pin Assembly
- Magnet
- Voice Coil
- Diaphragm
- On/Off Switch
- Body (Housing)
- Grille
- Plug
- Output Connector
- Cable
- Holder/Clip
- Stand
- Windscreen
Parts of a Microphone Diagram With Names
A microphone is made up of several important parts that work together to capture and convert sound into an audio signal. The diaphragm is a thin membrane that vibrates when sound waves reach it, while the capsule houses the main sound-capturing components. Inside the microphone, elements such as the voice coil, magnet, or internal circuitry help transform these vibrations into electrical signals. The body or housing protects the internal parts and provides a comfortable grip, and the grille helps shield the diaphragm from dust and breath noise. Other components, like the connector, switches, or control buttons, allow the microphone to send audio signals smoothly to recording devices or speakers. Each part plays a role in ensuring clear sound, durability, and reliable performance.
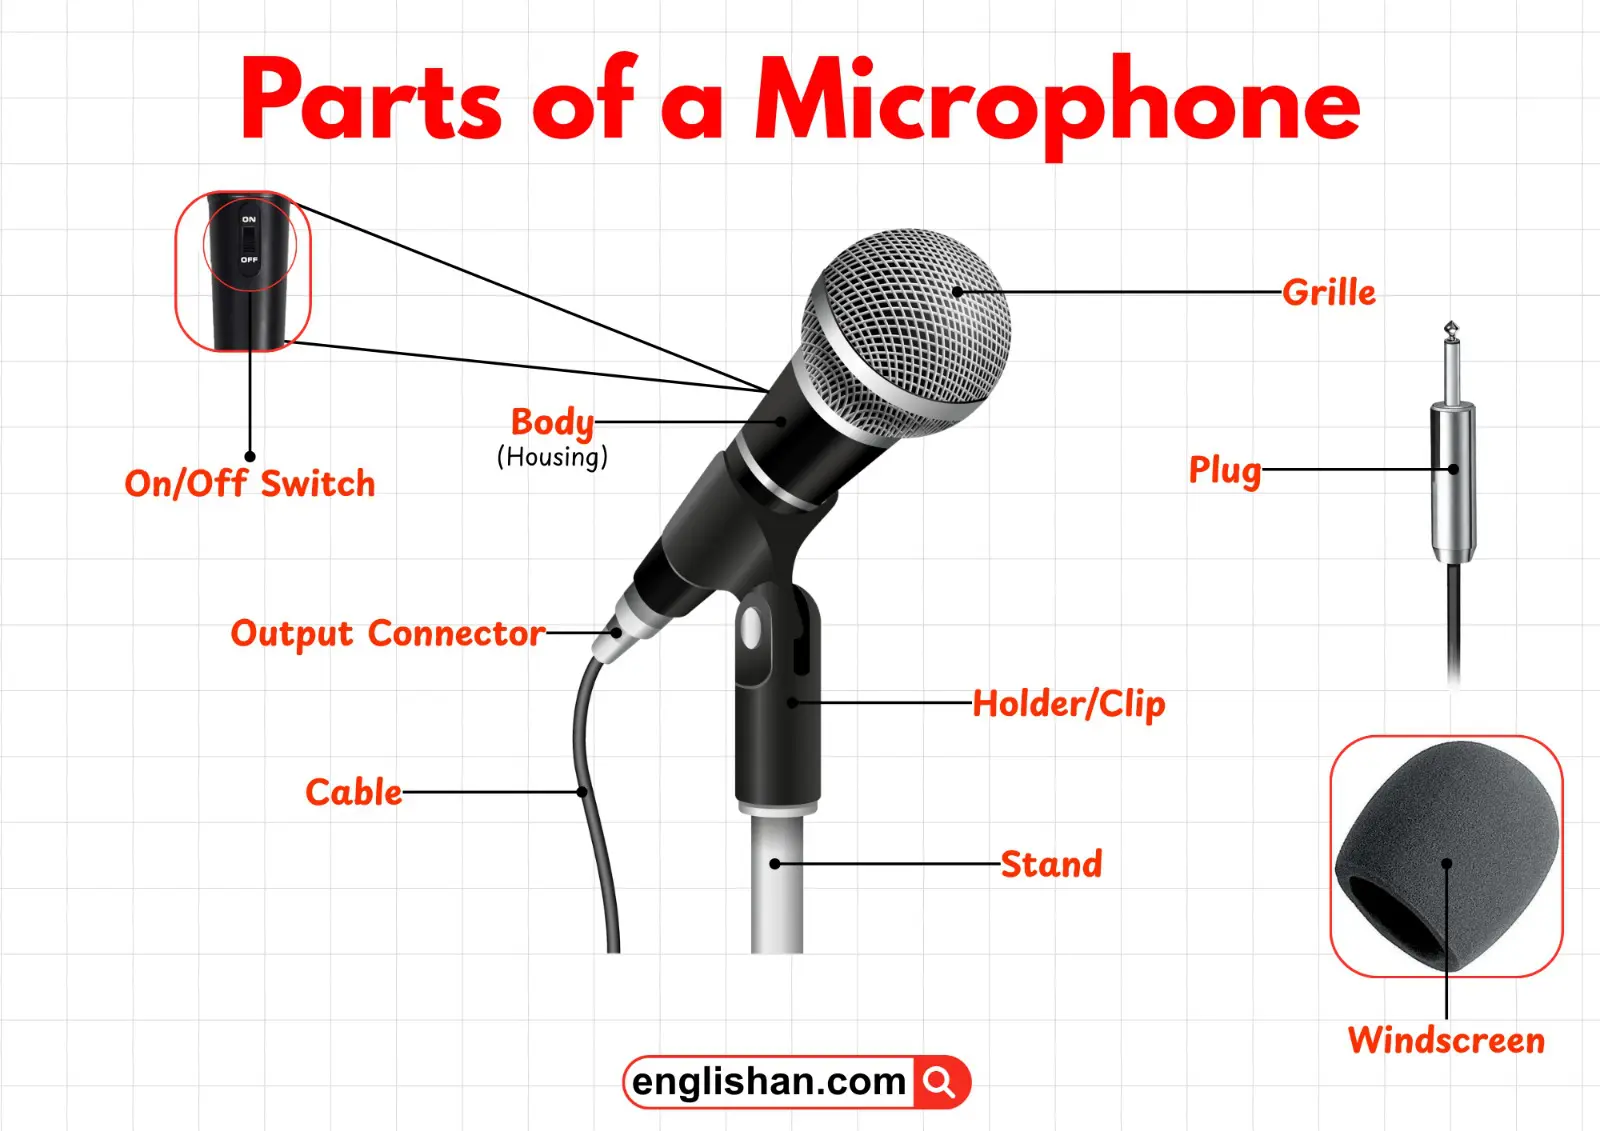
External Parts of a Microphone
Grille
The grille is the metal mesh covering at the top of the microphone. It protects the internal components, especially the diaphragm, from dust, moisture, and physical damage. It also helps reduce harsh breath sounds while speaking or singing.
Body (Housing)
The body, also called the housing, is the main outer casing of the microphone. It holds all the internal parts together and protects them from damage. The body also provides a comfortable grip for handheld microphones.
On/Off Switch
The on/off switch allows the user to turn the microphone signal on or off easily. It is commonly found on handheld microphones used in presentations or live performances.
Output Connector
The output connector is the point where the microphone connects to its cable. It transfers the electrical audio signal from the microphone to external devices such as mixers, amplifiers, or recording equipment.
Plug
The plug is the metal connector at the end of the microphone cable. It is inserted into audio equipment like mixers, speakers, or recording devices to transmit the microphone signal.
Cable
The cable carries the electrical audio signal from the microphone to other audio equipment. Good-quality cables help maintain clear sound and prevent signal interference.
Holder/Clip
The holder or clip is used to secure the microphone onto a stand. It keeps the microphone stable and allows the user to position it at the correct angle during recording or speaking.
Stand
The stand supports the microphone and holds it in a fixed position. It is especially useful during speeches, podcasts, studio recordings, and live performances so the user does not have to hold the microphone.
Windscreen
The windscreen is a foam cover placed over the microphone grille. It reduces wind noise, breathing sounds, and popping noises caused by strong air bursts when speaking certain letters like “P” and “B”.
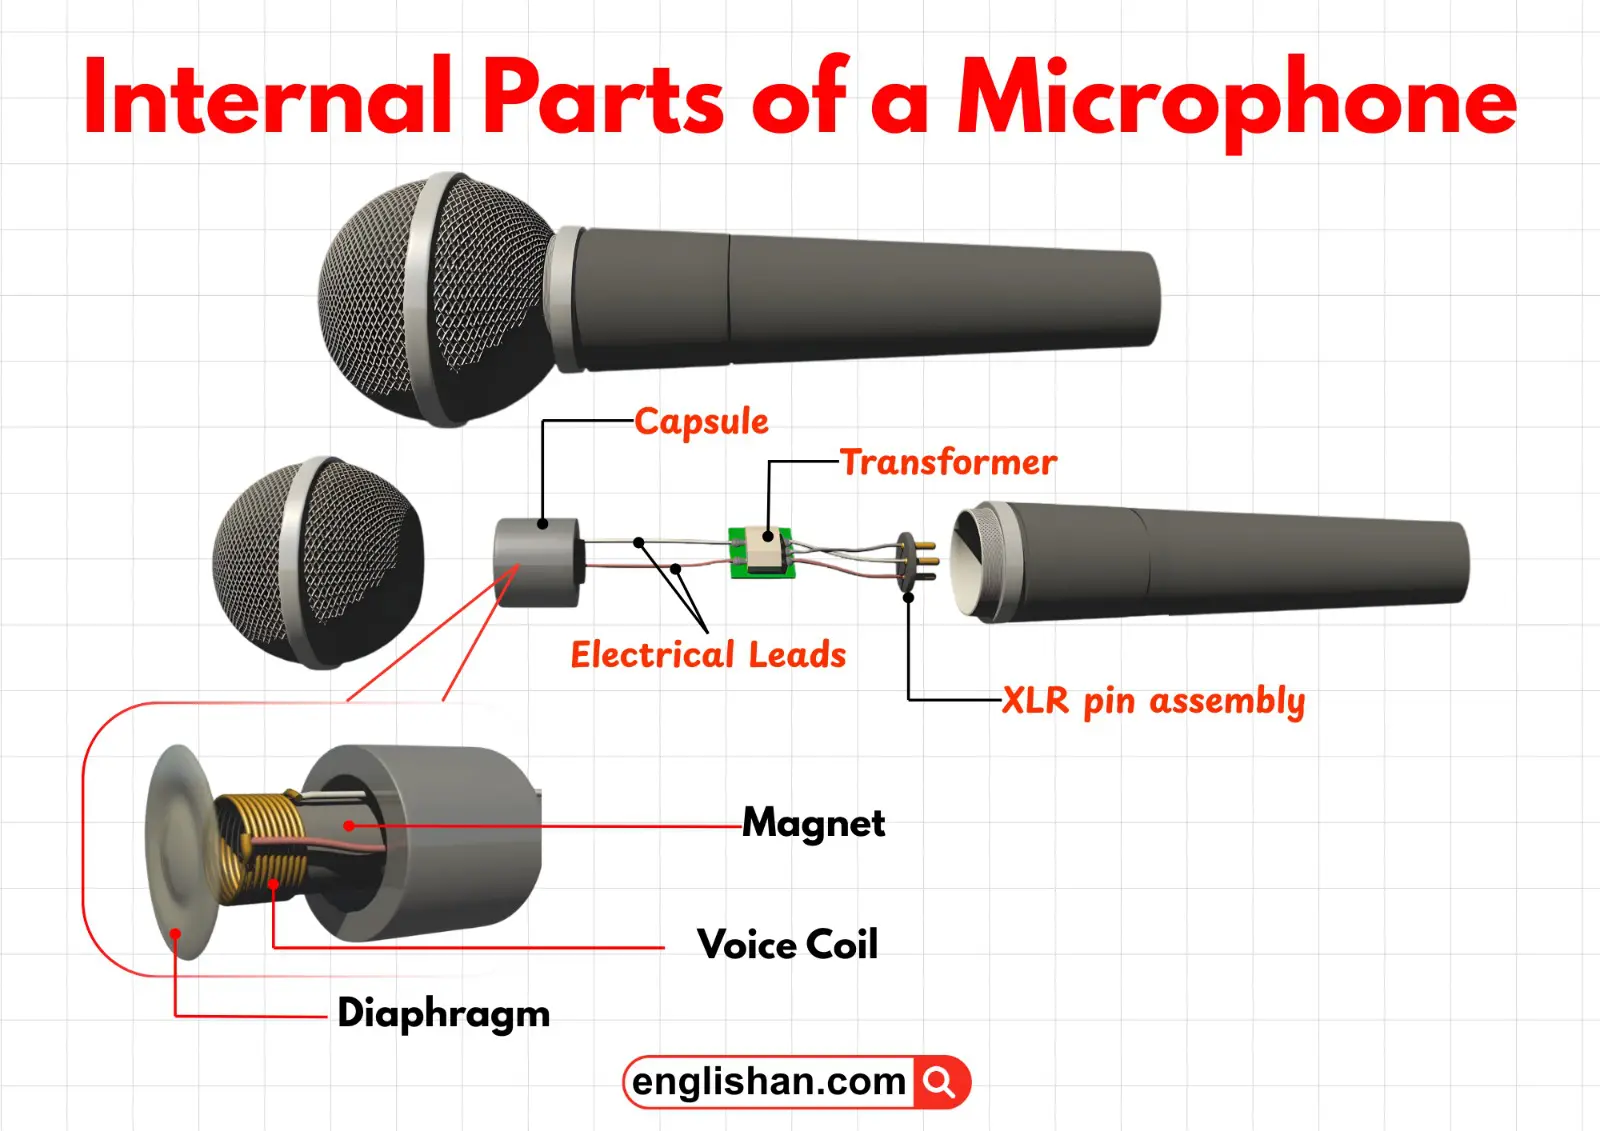
Internal Parts of a Microphone
Capsule
The capsule is the core component of a microphone where sound is first captured. It contains the diaphragm and other small components that convert sound waves into electrical signals. When a person speaks or sings into the it, the sound vibrations reach the capsule and begin the process of turning sound into an audio signal.
Transformer
The transformer helps manage and balance the microphone’s electrical signal before it leaves the microphone. It adjusts the voltage and impedance so the signal can travel through cables without losing quality. This ensures clearer sound and reduces electrical noise.
Electrical Leads
Electrical leads are thin wires that connect internal components inside the it. They carry the electrical signal produced in the capsule to other parts like the transformer and output connector. Without these wires, the signal could not travel through it.
XLR Pin Assembly
The XLR pin assembly is the internal connection point for the microphone cable. It usually has three pins that transmit the audio signal in a balanced format. This balanced connection helps reduce interference and is commonly used in professional microphones.
Magnet
The magnet is an important part of dynamic microphones. It creates a magnetic field around the voice coil. When the voice coil moves due to sound vibrations, the magnet helps generate an electrical current that represents the sound.
Voice Coil
The voice coil is a small coil of wire attached to the diaphragm. When the diaphragm vibrates because of sound waves, the voice coil moves within the magnetic field of the magnet. This movement generates an electrical signal that represents the original sound.
Diaphragm
The diaphragm is a thin, flexible membrane that reacts to sound waves. When sound hits the diaphragm, it vibrates rapidly. These vibrations move the voice coil, which then converts the motion into an electrical signal.
Key Takeaway
As we learned, a microphone converts sound waves into electrical signals so the sound can be recorded, amplified, or transmitted. Internal parts like the diaphragm, voice coil, and magnet capture and convert sound, while external parts such as the grille, body, and cable protect the microphone and help it function properly. Together, these anatomy allow microphones to capture clear audio for speaking, singing, and recording.
You May Also Like