When you look at a computer monitor, it seems like a simple screen. In reality, several components work together to display images, control brightness, connect to the computer, and support the structure of the device. Learning the parts of monitor helps you understand how the screen functions and how it connects with the rest of the system.
In this guide, the main monitor parts are explained with a labeled diagram and short descriptions so you can identify each component and understand its role in the display.
List of Computer Monitor Parts
- LCD / LED Panel
- Screen Glass
- Pixels (RGB Subpixels)
- Color Filters
- Diffuser Layer
- Backlight
- Bezel (Front Frame)
- Monitor Casing
- Back Cover / Rear Panel
- Ventilation Holes
- VESA Mount Holes
- Power Button
- Menu Button
- Brightness Button
- Volume Button
- Input / Source Button
- LED Indicator Light
- Power Port
- HDMI Port
- VGA Port
- DVI Port
- DisplayPort
- USB Ports
- Audio In Port
- Audio Out / Headphone Jack
- Support Arm
- Tilt Mechanism
- Height Adjustment Mechanism
- Swivel / Rotation Mechanism
- Power Supply Board
- Mainboard (Logic Board)
- T-Con Board
- Inverter Board (in older LCD monitors)
- Internal Speakers
- Internal Cables and Connectors
Parts of a Monitor Diagram With Names
A monitor is an electronic display device where each visible section has a specific name and function. From the display screen at the front to the base that supports it on a desk, every part is carefully designed to provide clear visuals, stable positioning, proper connectivity, and smooth performance. Understanding the different parts of a monitor helps you know how it works and how all components come together to display images, videos, and text clearly.
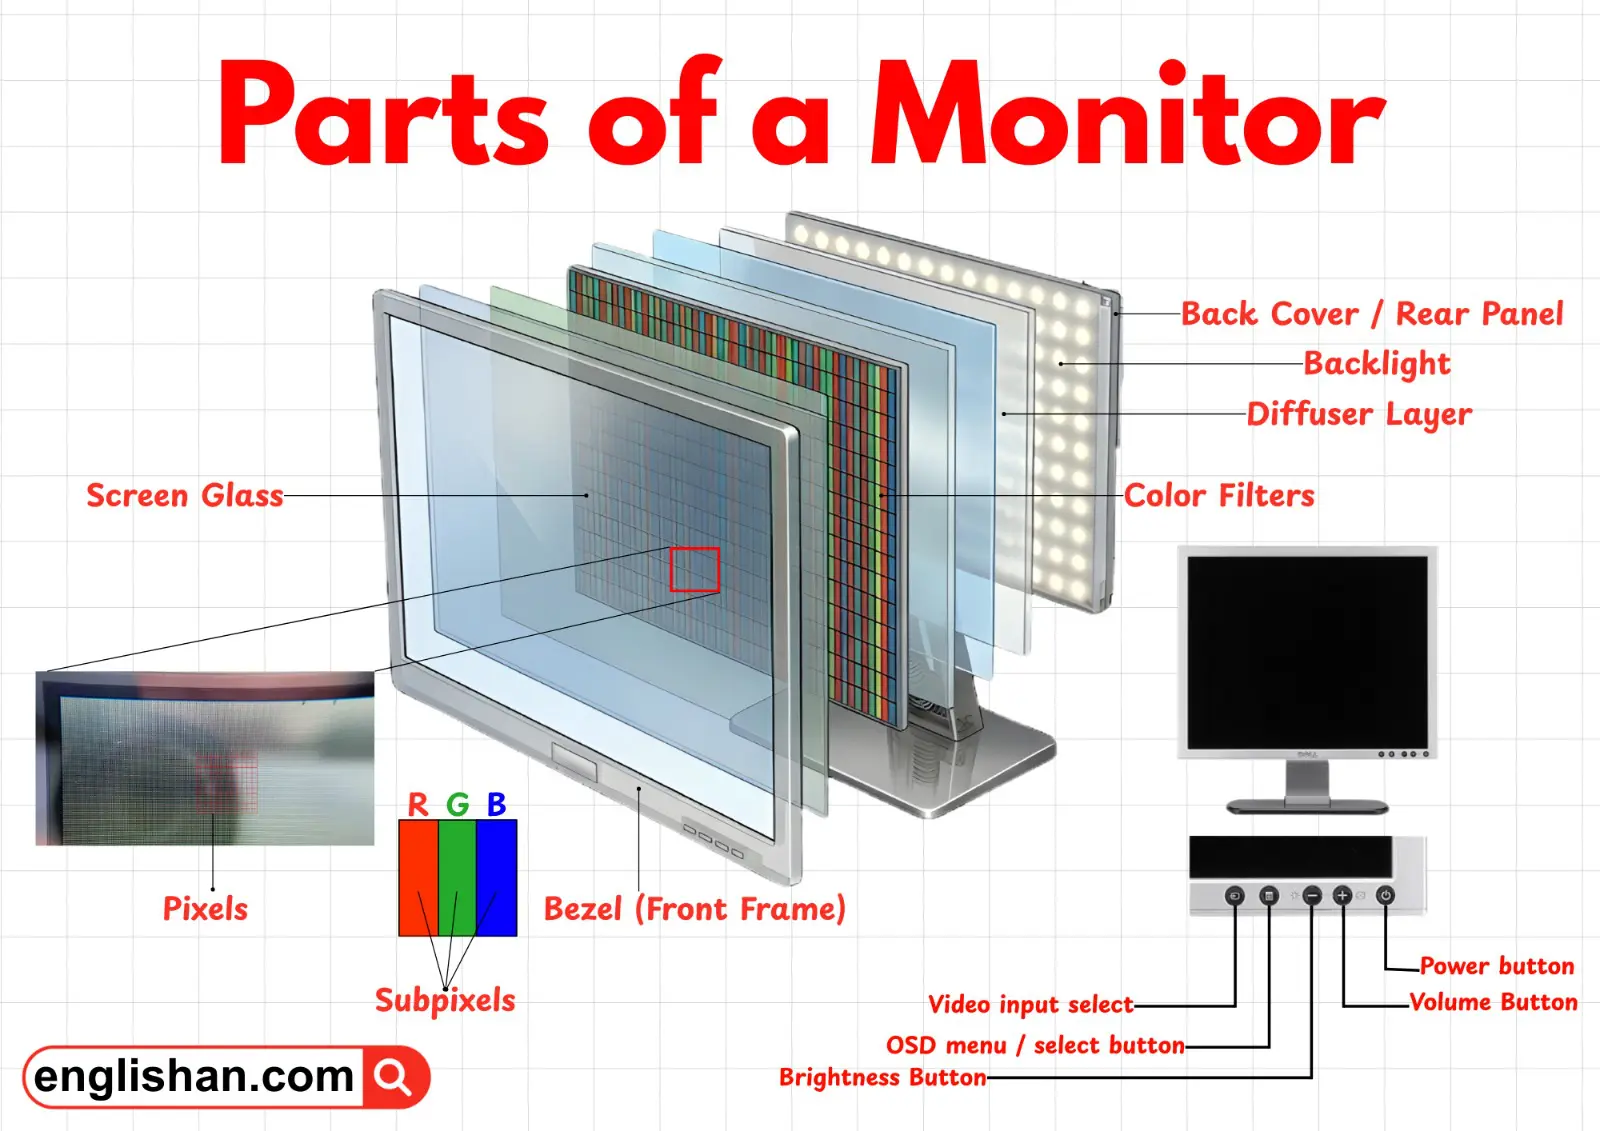
Display Screen Parts
The display screen is the most important part of your monitor because it shows everything you see.
LCD / LED Panel
This is the main component behind the glass. It produces the images you see. Modern monitors use LED or LCD technology, which controls light and color to give clear, sharp visuals. It’s usually flat and covers most of the front area of the monitor.
Screen Glass
The glass sits on the very front, protecting the delicate display panel underneath. It also gives a smooth surface for your eyes and reduces glare from sunlight or room lights.
Pixels (RGB Subpixels)
Inside the panel are millions of tiny pixels. Each pixel has red, green, and blue subpixels that mix to produce millions of colors. The more pixels, the sharper and more detailed the image.
Color Filters
Just above the pixels, these filters control how the red, green, and blue light is combined to make accurate colors on the screen.
Diffuser Layer
Found behind the color filters, it spreads light evenly across the screen so that images look uniform, avoiding bright spots or dark patches.
Backlight
At the very back of the screen, the backlight illuminates the display. Without it, the screen would be very dark, making images hard to see, especially in low-light rooms.
Frame and Outer Body Parts
The frame and body protect the monitor and give it its shape.
Bezel (Front Frame)
This is the thin border surrounding the display. It keeps the edges of the screen safe and gives the monitor a clean, polished appearance. Some modern monitors have ultra-thin bezels for a sleek look.
Monitor Casing
The casing is the hard shell that wraps around the monitor, holding all the components securely. It protects the electronics inside from dust, moisture, and accidental damage.
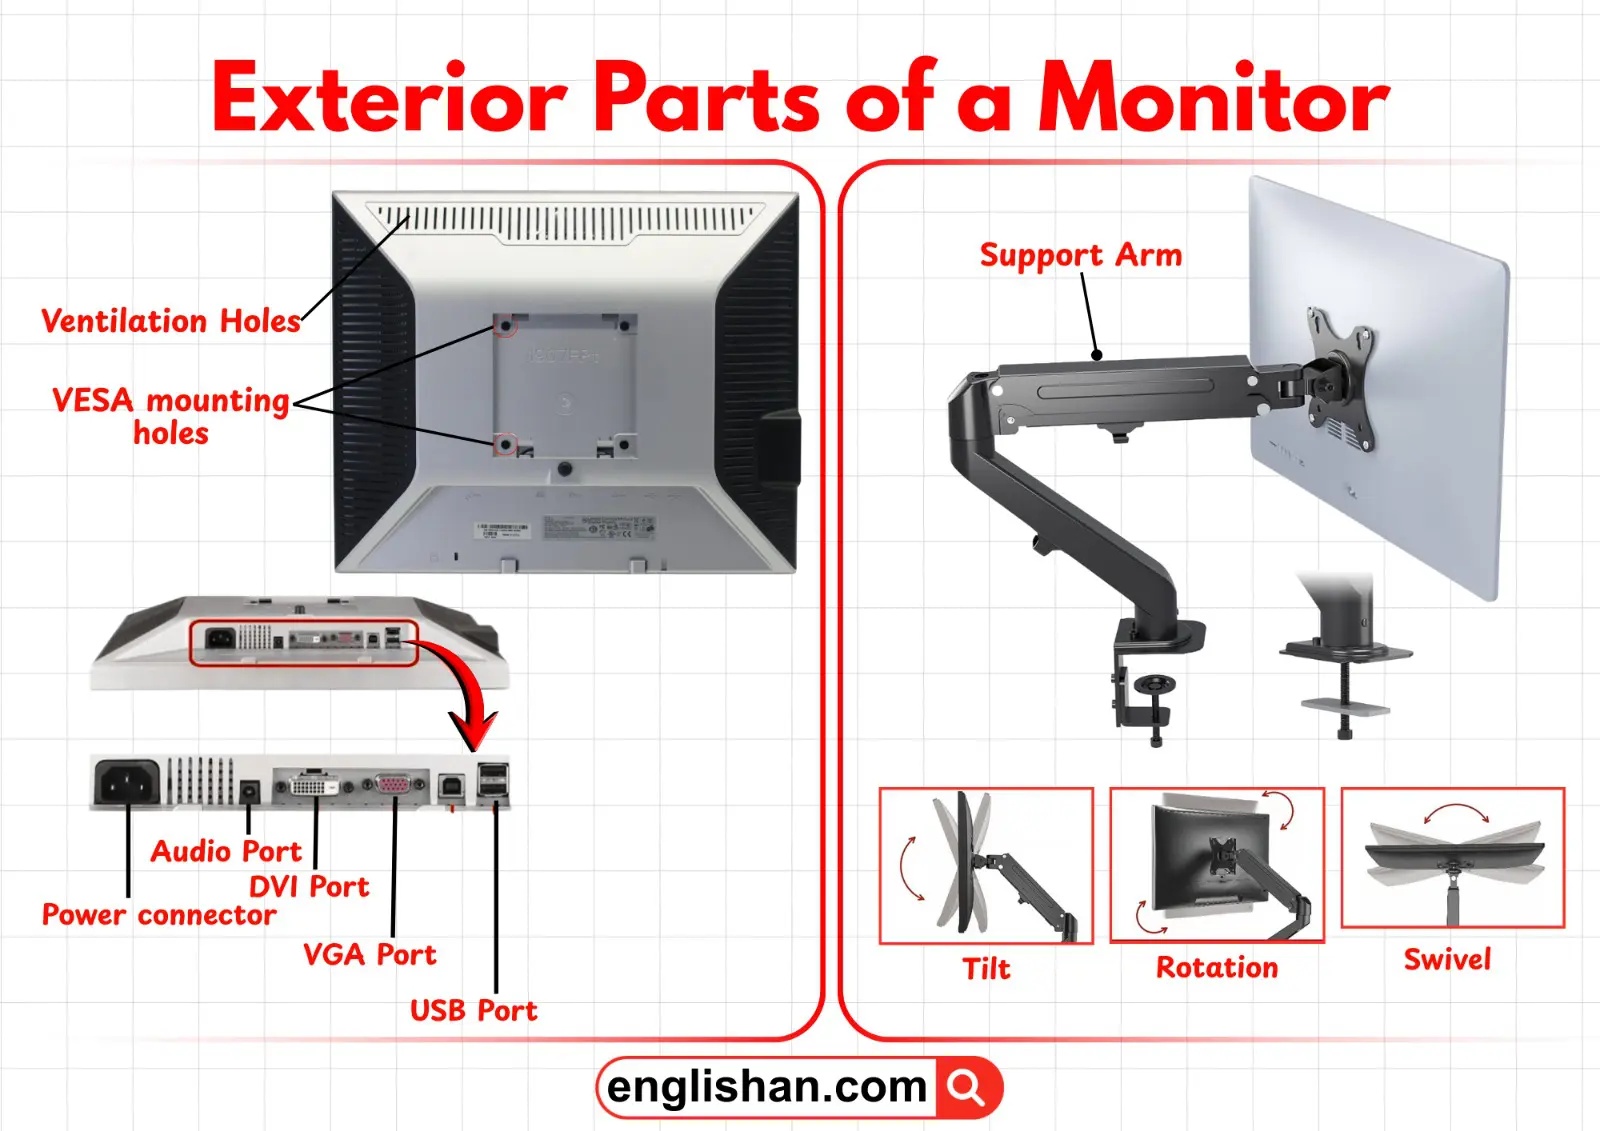
Back Cover / Rear Panel
Covers the entire back of the monitor and protects internal boards, cables, and connectors. Often, you’ll see vents or openings for ports here.
Ventilation Holes
Small holes or grills on the back or sides of the casing that allow hot air to escape, preventing the monitor from overheating during long usage.
VESA Mount Holes
Square or circular holes at the back panel used for mounting the monitor on a wall or a monitor arm, which saves desk space and gives flexibility in positioning.
Control Panel Parts
Control buttons are usually on the bottom or side edges of the monitor for easy access. They let you adjust settings without using your computer.
Power Button
Located on the lower front or side edge, this button turns the monitor on and off. On many monitors, it also switches the device to standby mode when not in use.
Menu Button
Usually next to the power button, it opens the on-screen menu, letting you adjust brightness, contrast, colors, and other display settings.
Brightness Button
Near the menu button, this lets you make the screen brighter in sunny rooms or dimmer in low-light environments to reduce eye strain.
Volume Button
Found on monitors with built-in speakers, often next to the brightness controls. It adjusts the speaker volume.
Input / Source Button
Located along the same edge as other control buttons. It switches between devices connected to your monitor, such as a laptop on HDMI or a console on DisplayPort.
LED Indicator Light
Usually a small light near the buttons that shows whether the monitor is powered on (solid light), off, or in standby mode (blinking light).
Ports and Connectivity Parts
Ports are the monitor’s connection points for power, video, audio, and other devices. They are mostly found at the back panel or sometimes underneath the monitor for a clean setup.
Power Port
Located on the lower back of the monitor, this is where you connect the power cable to supply electricity.
HDMI Port
Usually at the back or slightly underneath the monitor. HDMI carries high-quality video and audio from modern computers, laptops, or gaming consoles.
VGA Port
Found on the back; an older video connection mostly used for older computers and laptops.
DVI Port
Typically near VGA and HDMI ports; it’s another older digital video connection.
DisplayPort
Usually on the back; provides high-quality video signals for professional or gaming monitors.
USB Ports
Can be on the back or sides of the monitor. These let you connect flash drives, keyboards, or even charge devices like smartphones.
Audio In Port
Located near the other ports; allows external audio devices to play sound through the monitor’s speakers.
Audio Out / Headphone Jack
Usually on the back or side; lets you connect headphones or external speakers for private listening.
Stand Neck (Support Arm) Parts
The stand neck is the vertical part connecting the screen to the base. It’s located at the center bottom back of the monitor. It provides stability and allows adjustments for viewing comfort.
Support Arm
The main vertical piece that holds the monitor screen above the base. It keeps the monitor stable and upright.
Tilt Mechanism
Built into the joint between the neck and the monitor. This lets you tilt the screen forward or backward for the best viewing angle.
Height Adjustment Mechanism
Part of the stand neck in adjustable monitors. It lets you raise or lower the screen to match your eye level.
Swivel / Rotation Mechanism
Located in the neck joint, this allows you to rotate the screen left or right or even turn it into portrait mode for reading documents or coding.
Internal Electronic Parts
These parts are located inside the rear panel of the monitor and are usually hidden from view. They are responsible for processing signals and powering the monitor.
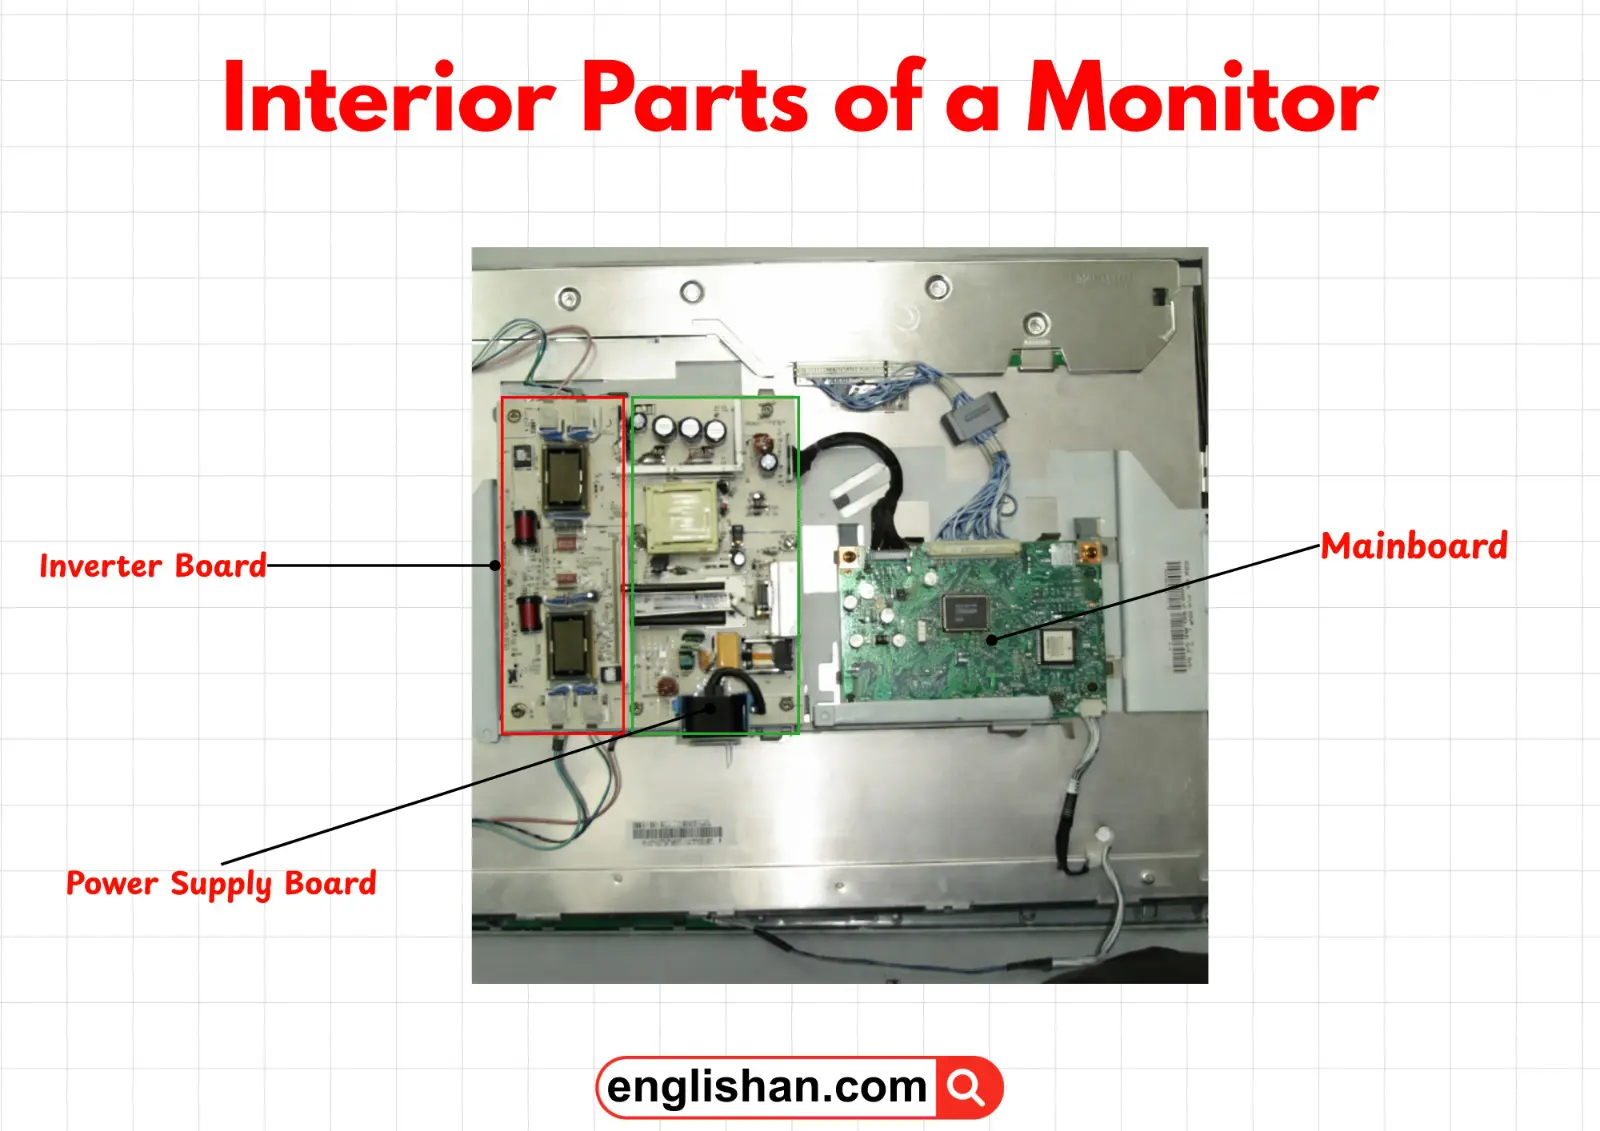
Power Supply Board
Positioned near the power port inside the rear panel. It converts electricity from your wall into usable power for the monitor’s internal components.
Mainboard (Logic Board)
The “brain” of the monitor. Found behind the back panel, it processes signals from your computer and tells the screen what images to display.
T-Con Board
Located between the mainboard and the display panel. It controls the timing of signals to the pixels so the correct images appear at the right time.
Inverter Board (older LCD monitors)
Found near the back of the screen; it powers the backlight in older LCD monitors so the display stays bright.
Internal Speakers
Built into the bottom or side of the monitor. They play sound directly from the monitor without needing external speakers.
Internal Cables and Connectors
Found inside connecting all internal boards, backlight, and speakers. They make sure the monitor parts work together smoothly.
Key Takeaways
As we learned, a monitor is made up of several parts that work together to display images and process signals efficiently. The display screen shows visuals using pixels, color filters, and a backlight layer. The bezel and frame protect the screen, while the back panel houses ports, ventilation holes, and internal electronic boards. Control buttons on the edges let you adjust brightness, volume, and input sources easily. The stand neck and base provide stability and allow tilt, height, and swivel adjustments. Inside, the mainboard, T-Con board, power supply, and internal cables handle signal processing and power distribution. Each part is located in a specific place and plays a role in making the monitor fully functional.
You May Also Like
- Parts of a PC
- Parts of a Laptop
- Parts of a Computer Mouse
- Parts of Computer Monitor
- Parts of Speaker
- Parts of a Keyboard