
Have you ever wondered how a simple rubber tube can let you hear a heartbeat so clearly? It is fascinating to look at this tool and realize how it connects you to the rhythm of a living body. When you examine the parts of stethoscope, you see that it is actually just a few simple pieces working together to carry sound.
Whether you are a student or just curious about how it works, knowing the difference between the chest piece and the earpieces is a great start. I find that once you know what the bell and diaphragm do, the whole instrument makes much more sense.
I have broken down the tubing, stem, and headset below to show you exactly how they fit. You will find a simple guide to this famous instrument that explains what each piece does. Let’s look at the diagram.
Stethoscope Parts Labeled Diagram
Use these labels on your diagram, in this order:
- 1 Chestpiece
- 2 Diaphragm
- 3 Bell
- 4 Stem
- 5 Rim
- 6 Tubing
- 7 Headset
- 8 Ear Tubes
- 9 Tension Spring
- 10 Ear Tips
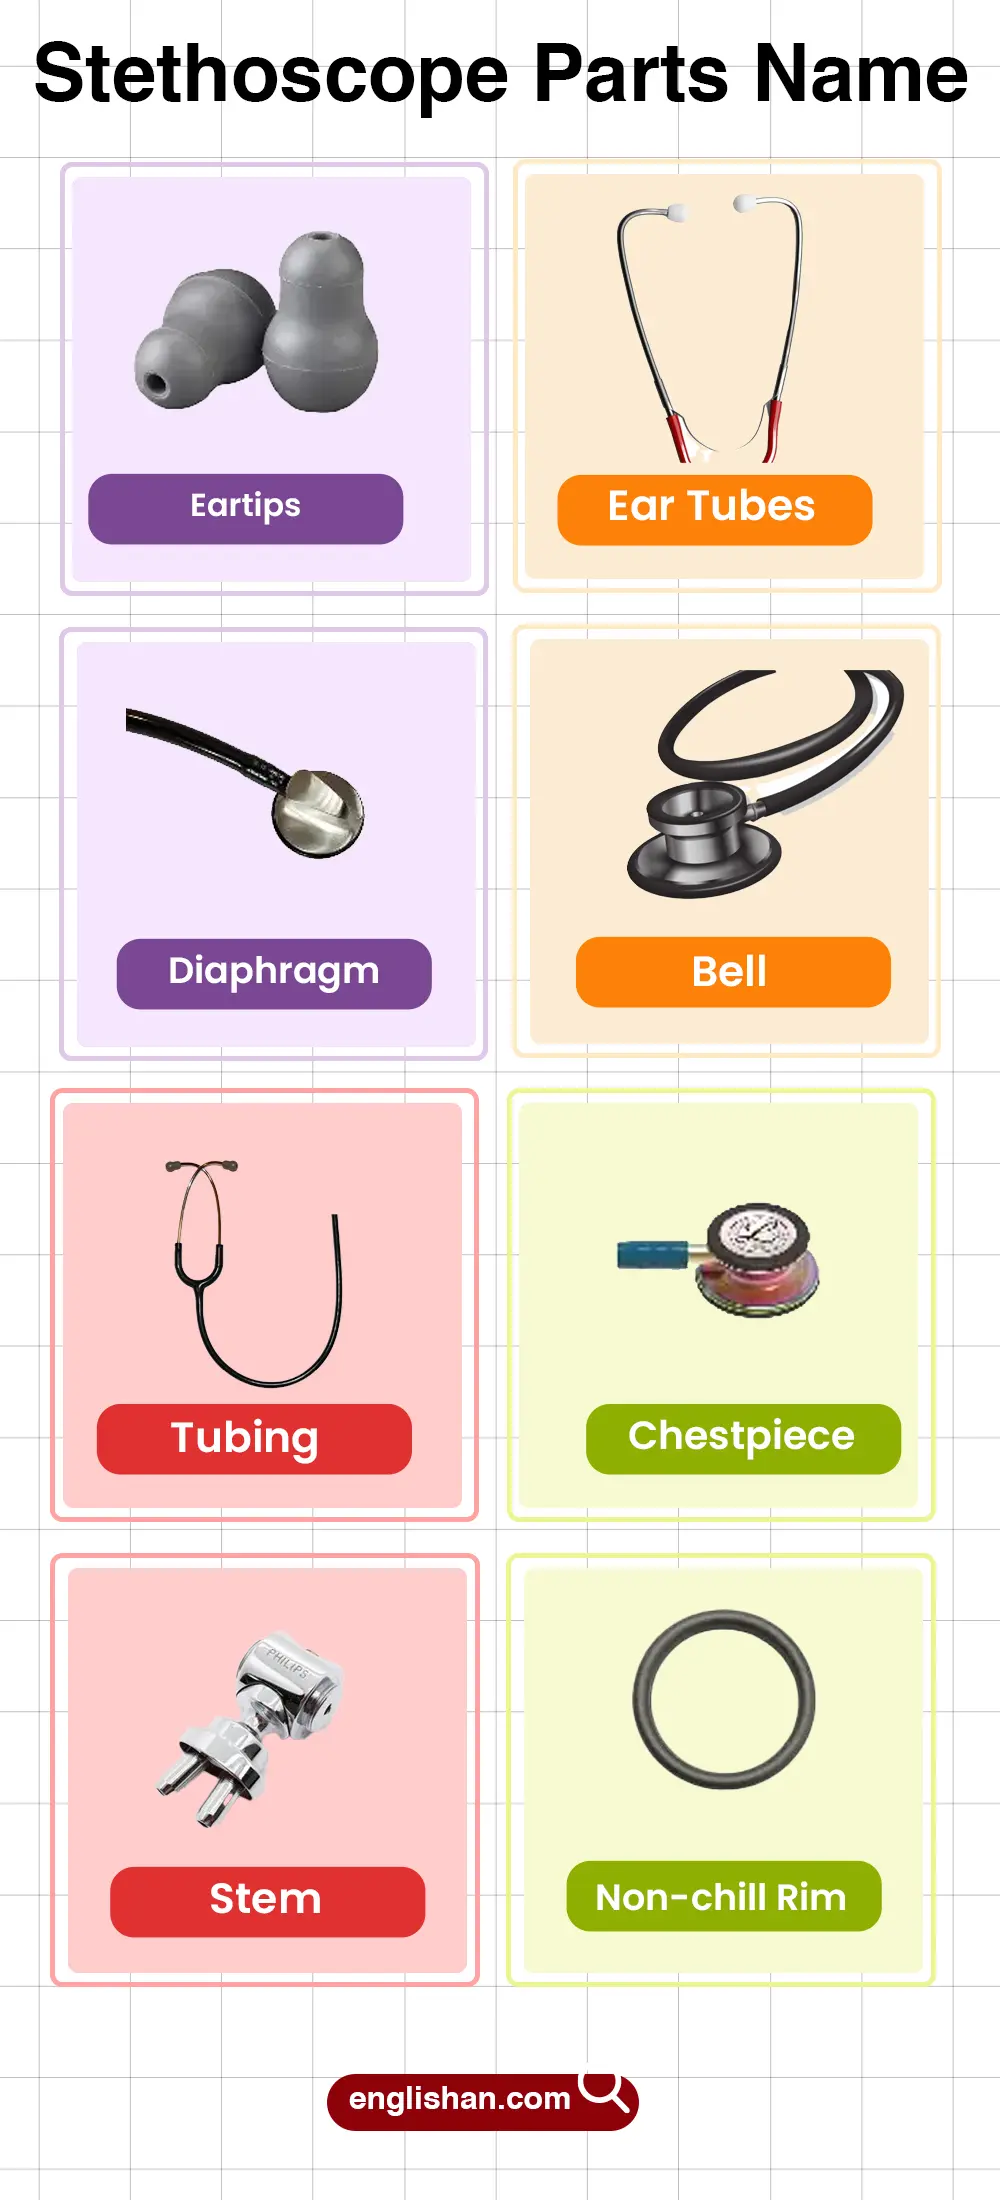
Quick label checks:
- Diaphragm is the flat side.
- Bell is the cup side.
- Ear tips point slightly forward when worn.
Stethoscope Chestpiece Parts
The chestpiece is where sound starts. A good seal matters. Even a small gap can weaken sound.
Stethoscope Diaphragm
- Flat surface that sits against skin.
- Best for most routine listening.
- Works well when pressed lightly but firmly.
- If cracked or loose, sound becomes weak or rough.
Stethoscope Bell
- Cup-shaped side on many models.
- Helps with low sounds.
- Often used with lighter pressure.
- If the edge does not seal, sound fades.
Stethoscope Stem
- The central connector of the chestpiece.
- Links the chestpiece to the tubing.
- On some models, it also switches between diaphragm and bell.
- If loose, sound may drop or cut in and out.
Stethoscope Rim
- Soft ring around the chestpiece edge.
- Helps seal on skin and improves comfort.
- If hardened or torn, you may hear more outside noise.
Stethoscope Tubing
Tubing carries sound from chestpiece to headset.
- One-piece tubing: one tube from chestpiece to headset.
- Two-channel tubing: looks like one tube, but has two sound paths inside.
Common tubing issues:
- Cracks: cause faint sound.
- Stiff tubing: pulls the chestpiece off the skin.
- Loose connection at chestpiece: causes sound loss.
Care habits:
- Keep away from heat and direct sun.
- Do not wrap too tight for storage.
- Wipe with a damp cloth after use.
Stethoscope Headset Parts
The headset shapes comfort and sound at the ear end.
Stethoscope Ear Tubes
- Metal tubes that carry sound upward.
- Must line up with ear canals.
- If bent outward, seal gets poor and sound weakens.
Stethoscope Tension Spring
- Controls how tight the headset feels.
- Too tight: ear pain.
- Too loose: poor seal and more outside noise.
Small fit check:
- If the headset slips, it is too loose.
- If ears ache fast, it is too tight.
Stethoscope Ear Tips
- Soft tips that sit in the ears.
- A good seal is key for strong sound.
- If tips are hard, worn, or loose, sound gets weak.
Fit check:
- Tips should point slightly forward.
- Both tips should feel even.
Pediatric Stethoscope Parts
A pediatric stethoscope uses the same part names, but sizes change.
- Smaller diaphragm and bell: fits small chests better.
- Shorter tubing on many models: easier handling near a child.
- Smaller ear tips options: better fit for smaller ears.
- Lighter overall feel: easier to hold steady.
Use the same care rules, but check the rim and diaphragm more often since seals matter more on small contact areas.
Stethoscope Replacement Parts
Replacement helps when sound drops or comfort changes. Most swaps take minutes.
- Ear tips: most common replacement.
- Diaphragm: replace if cracked, loose, or warped.
- Rim: replace if torn, hard, or missing.
- Spare kit: useful for clinics and schools.
Stethoscope Spare Parts Kit
Typical kit items:
- Ear tips (small and large)
- Diaphragm
- Rim
- Name tag (model dependent)
Before buying:
- Match your stethoscope brand and model name.
- Match chestpiece size (adult vs pediatric).
Stethoscope Ear Tip Replacement
- Pull off the old ear tips.
- Push on the new tips until they sit snug.
- Tug lightly to confirm they do not slip.
- Wear the headset and check comfort and seal.
Signs you replaced correctly:
- Sound is stronger.
- Outside noise drops.
- Tips do not wobble.
Stethoscope Diaphragm Replacement
- Remove the old diaphragm (method depends on model).
- Clean the chestpiece edge with a damp cloth.
- Fit the new diaphragm evenly around the edge.
- Press around the full rim to seat it flat.
Check after replacement:
- No gaps on the edge.
- No rattling when you tap the chestpiece.
Conclusion
Learning stethoscope parts name in English helps students identify and describe medical tools accurately. It supports vocabulary development for science and healthcare topics, making language use more precise. Knowing each part improves understanding in both classroom and practical learning situations.
FAQs
The main parts include headset (ear tubes, ear tips), tubing, chestpiece (diaphragm, bell), and stem. These terms match standard medical vocabulary used by professionals.
The diaphragm is the flat side for high-pitched sounds, while the bell is a hollow cup for low-pitched sounds like murmurs.
Ear tips create a seal in your ears, which helps block outside noise and improve the accuracy of what you hear.
You May Also Like