In this blog post, you will learn the different parts of a compound microscope in English. A microscope is an important tool used to see tiny objects that cannot be seen with the naked eye. Each part has a specific function that helps in magnifying and focusing the image. Understanding these terms will improve your vocabulary, especially in science and biology.
To learn more vocabulary on different topics, visit our Vocabulary Category.
What is a Compound Microscope?
A compound microscope is a sophisticated optical instrument that plays a pivotal role in the field of biology, medicine, and various scientific disciplines. Its ability to magnify minute structures and organisms makes it an invaluable tool for researchers, scientists, and students alike. To fully understand the functioning of a compound microscope, it is essential to delve into its individual components.
Types of Compound Microscope
Let’s break down the types of compound microscopes in simpler terms:
- Student Microscopes:
- For Who: Students in schools.
- What They Do: Help students look at small things, like tiny bugs or plant cells.
- How They’re Different: Simple and not too expensive, made for learning.
- Research Microscopes:
- For Who: Scientists doing advanced research.
- What They Do: Used to see very tiny details in things, like cells or tiny organisms.
- How They’re Different: Fancy microscopes with better features for serious science work.
- Clinical Microscopes:
- For Who: Doctors and scientists in hospitals and labs.
- What They Do: Used to study things like blood or tissue samples for medical reasons.
- How They’re Different: Special microscopes for health-related work.
- Inverted Microscopes:
- For Who: Scientists studying things in containers.
- What They Do: Help look at stuff from the bottom, like cells in a dish.
- How They’re Different: Flipped design for special types of experiments.
- Digital Microscopes:
- For Who: Anyone who wants to see things on a computer.
- What They Do: Take pictures and show them on a computer screen.
- How They’re Different: Have a camera to take pictures easily.
- Phase Contrast Microscopes:
- For Who: Scientists studying living things.
- What They Do: Make it easier to see things without coloring them.
- How They’re Different: Special way of looking at transparent stuff.
- Fluorescence Microscopes:
- For Who: Scientists studying glowing things.
- What They Do: Help see things that glow under special lights.
- How They’re Different: Used for studying things that light up.
Remember, microscopes are like super eyes that help scientists and students see things that are too tiny for regular eyes!
Parts of Compound Microscope
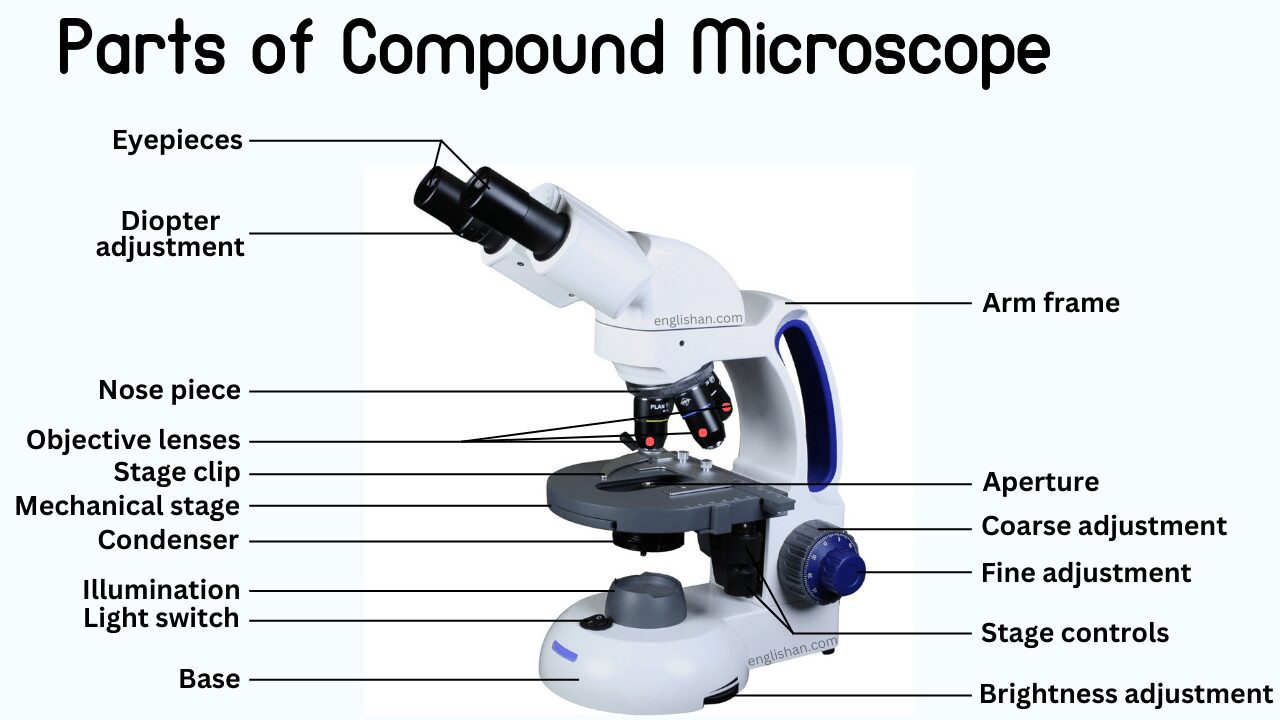
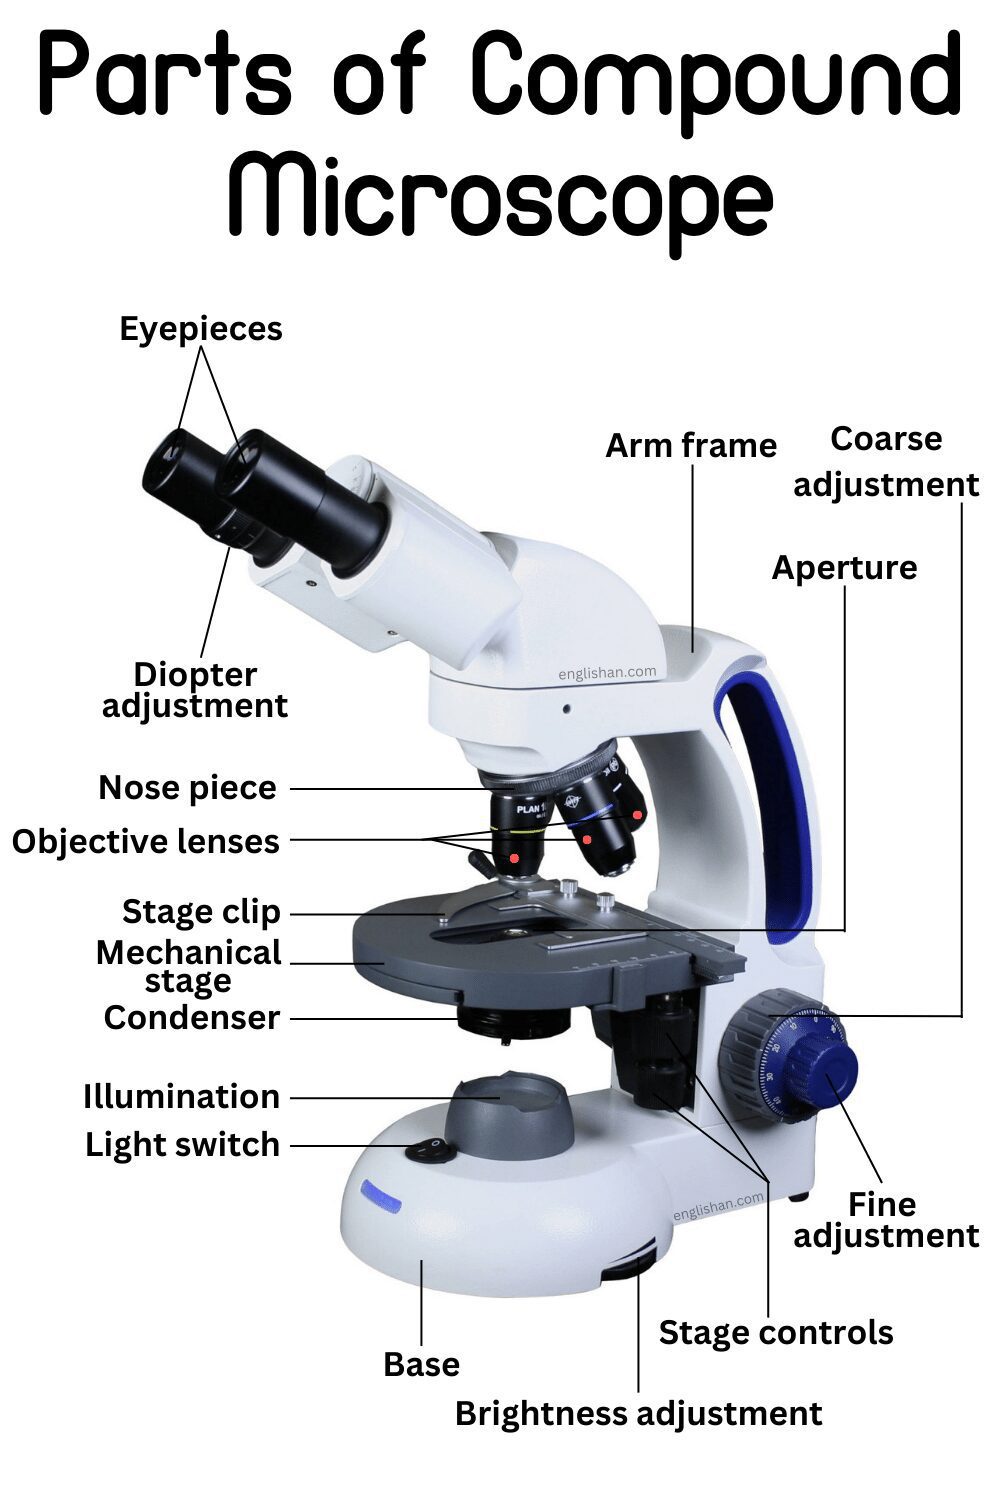
Here’s a breakdown of the various parts of a compound microscope:
-
Eyepiece (Ocular Lens):
- The eyepiece is the lens you look through at the top of the microscope.
- It magnifies the image produced by the objective lenses.
-
Objective Lenses:
- These are the lenses located on the revolving nosepiece beneath the eyepiece.
- Objective lenses provide different levels of magnification, ranging from low to high power.
-
Nosepiece (Revolving Nosepiece):
- The nosepiece is a rotating structure that holds the objective lenses.
- It allows for easy switching between different objective lenses for varied magnification.
-
Stage:
- The flat platform beneath the objective lenses where the microscope slide is placed.
- The stage holds the specimen for observation.
-
Stage Clips:
- Clips on the stage that secure the microscope slide in place.
- They prevent the slide from moving during observation.
-
Condenser:
- A lens system located beneath the stage.
- The condenser focuses and concentrates light onto the specimen, improving image clarity.
-
Iris Diaphragm:
- Part of the condenser, it consists of adjustable blades.
- The iris diaphragm controls the amount of light reaching the specimen, influencing contrast and brightness.
-
Base:
- The bottom part of the microscope that provides stability.
- The base supports the entire microscope structure.
-
Diopter Adjustment:
- A feature often found on one of the eyepieces.
- Allows individual adjustment of the focus for each eye, especially useful for users with different eyesight prescriptions.
-
Mechanical Stage:
- The platform on the stage that holds and controls the movement of the microscope slide.
- Enables precise positioning and easy movement of the specimen for observation.
-
Condenser:
- A lens system located beneath the stage.
- Focuses and concentrates light onto the specimen, enhancing image clarity.
-
Illumination:
- The overall provision of light to illuminate the specimen.
- Essential for visualization, illumination ensures proper visibility of the specimen under the microscope.
-
Light Switch:
- The control for turning the microscope’s light source on and off.
- Allows the user to control the illumination as needed during observation.
-
Arm Frame:
- The supportive structure connecting the body tube to the base of the microscope.
- Provides stability and strength to the microscope, supporting the various components.
-
Coarse Adjustment:
- A large knob typically located on one side of the microscope.
- Used for rough focusing, making larger adjustments to bring the specimen into initial focus.
-
Aperture:
- An opening in the condenser.
- Controls the amount of light that reaches the specimen, influencing contrast and resolution.
-
Fine Adjustment:
- A smaller knob usually located next to the coarse adjustment knob.
- Allows for precise focusing, making smaller adjustments to bring the specimen into sharp focus.
-
Stage Controls:
- Various knobs and mechanisms on the stage.
- Used for manipulating the position of the mechanical stage, allowing for controlled movement of the microscope slide.
-
Brightness Adjustment:
- A control feature often associated with the microscope’s light source.
- Enables the adjustment of the overall brightness of the illumination, ensuring optimal lighting conditions for observation.
Understanding the functions of each part is crucial for using a compound microscope effectively, whether for educational purposes or scientific research.
Functions of Compound Microscope
Working Principle of Compound Microscope
Let’s break down the working principle of a compound microscope in simpler terms:
- Magnification: A microscope makes small things look big. It does this by using two sets of lenses, one near your eye (eyepiece) and another close to the object (objective lens).
- Objective Lenses: There are different lenses you can use, like changing glasses. Each lens makes the object look bigger in its way.
- Ocular Lens (Eyepiece): The eyepiece is where you look. It also makes the object look bigger. Think of it like a magnifying glass for your eye.
- Light Source: The microscope has a light to shine on the small thing you’re looking at. This light helps you see the object better.
- Condenser: The condenser helps to focus the light onto the small thing you’re studying. It’s like a helper for the light.
- Focusing Mechanism: There are two knobs to help you focus. One is for big adjustments (coarse adjustment), and the other is for small adjustments (fine adjustment). It’s like tuning a radio to get a clear signal.
- Stage and Controls: The stage is like a little table where you put the small thing (slide) you want to look at. There are knobs to move the table around so you can see different parts of the small thing.
- Image Formation: When you look through the eyepiece, the combination of lenses makes the small thing appear much bigger and clearer. It’s like magic for your eyes!
In simple terms, a compound microscope uses lenses and light to make tiny objects look much larger, and you can adjust the focus to see them clearly. It’s like having super eyes to explore the world of really small things!
Advantages and Disadvantages of Compound Microscope
Advantages of Compound Microscope
- High Magnification: Compound microscopes can achieve high levels of magnification, allowing for detailed observation of small structures and specimens.
- Resolution: They provide good resolution, enabling the user to distinguish fine details and structures within the specimen.
- Versatility: Compound microscopes are versatile instruments suitable for studying a wide range of specimens, including cells, tissues, microorganisms, and other small structures.
- Scientific Research: Widely used in scientific research, compound microscopes contribute to advancements in fields such as biology, medicine, materials science, and more.
- Educational Value: Essential tools in educational settings, compound microscopes facilitate hands-on learning and exploration of the microscopic world for students.
- Objective Lens Variety: The availability of multiple objective lenses allows users to switch between different magnification levels, enhancing flexibility in observation.
- Image Clarity: With proper sample preparation and adjustment, compound microscopes can produce sharp and well-defined images.
- Depth of Field: Compound microscopes can provide a better depth of field, allowing more of the specimen to be in focus at the same time compared to some other types of microscopes.
Disadvantages of Compound Microscope
- Cost: High-quality compound microscopes can be expensive, especially those designed for advanced research with specialized features.
- Complexity: Some users, particularly beginners, may find the numerous adjustments and features of compound microscopes somewhat complex to operate.
- Limited Depth of Field: At high magnifications, compound microscopes may have a limited depth of field, making it challenging to keep the entire specimen in focus.
- Maintenance: Compound microscopes require regular maintenance to ensure optimal performance. Cleaning lenses, aligning components, and handling with care are essential.
- Sample Preparation: Some specimens may require special preparation techniques, such as staining, to enhance visibility under a compound microscope.
- Size and Portability: Compound microscopes are generally larger and less portable compared to simpler microscopes like magnifying glasses.
- Risk of Contamination: When using oil immersion lenses, there is a risk of introducing contaminants or damaging the lenses if not handled properly.
In summary, while compound microscopes offer numerous advantages, they also come with certain limitations and considerations, including complexity, cost, and maintenance requirements. The choice of microscope depends on the specific needs and preferences of the user.
FAQs
A compound microscope is used to magnify small objects and observe them in detail. It is commonly used in scientific research, education, and various industries to study microscopic structures.
A compound microscope uses two sets of lenses (eyepiece and objective lenses) to magnify the specimen. Light passes through the specimen, and the lenses magnify the image, allowing for detailed observation.
The main parts include the eyepiece, objective lenses, nosepiece, stage, stage clips, illuminator, condenser, coarse and fine adjustment knobs, and the base.
Choose the lowest magnification first (usually 4x or 10x), place the specimen on the stage, and focus. Then, increase the magnification gradually by rotating the nosepiece to higher-powered objective lenses for more detail.
Coarse adjustment is for initial focusing and involves larger adjustments, while fine adjustment is for precise focusing and involves smaller, more delicate adjustments.
Yes, some compound microscopes are equipped with special features like phase contrast or differential interference contrast (DIC) to observe live, transparent specimens without staining.
Use lens cleaning solution or a mixture of water and ethanol. Gently wipe the lenses with lens paper or a lens-cleaning cloth in a circular motion. Avoid using rough materials that may scratch the lenses.
You May Also Like

