

The parts of a blender stack in a single column, with a lidded jar on top and a motor base underneath. A blade assembly is mounted in the bottom of the jar and locks onto the base.
Every part a cook removes for washing belongs to the jar and the lid, and the motor stays fixed in the base.
Blender Parts Diagram With Names
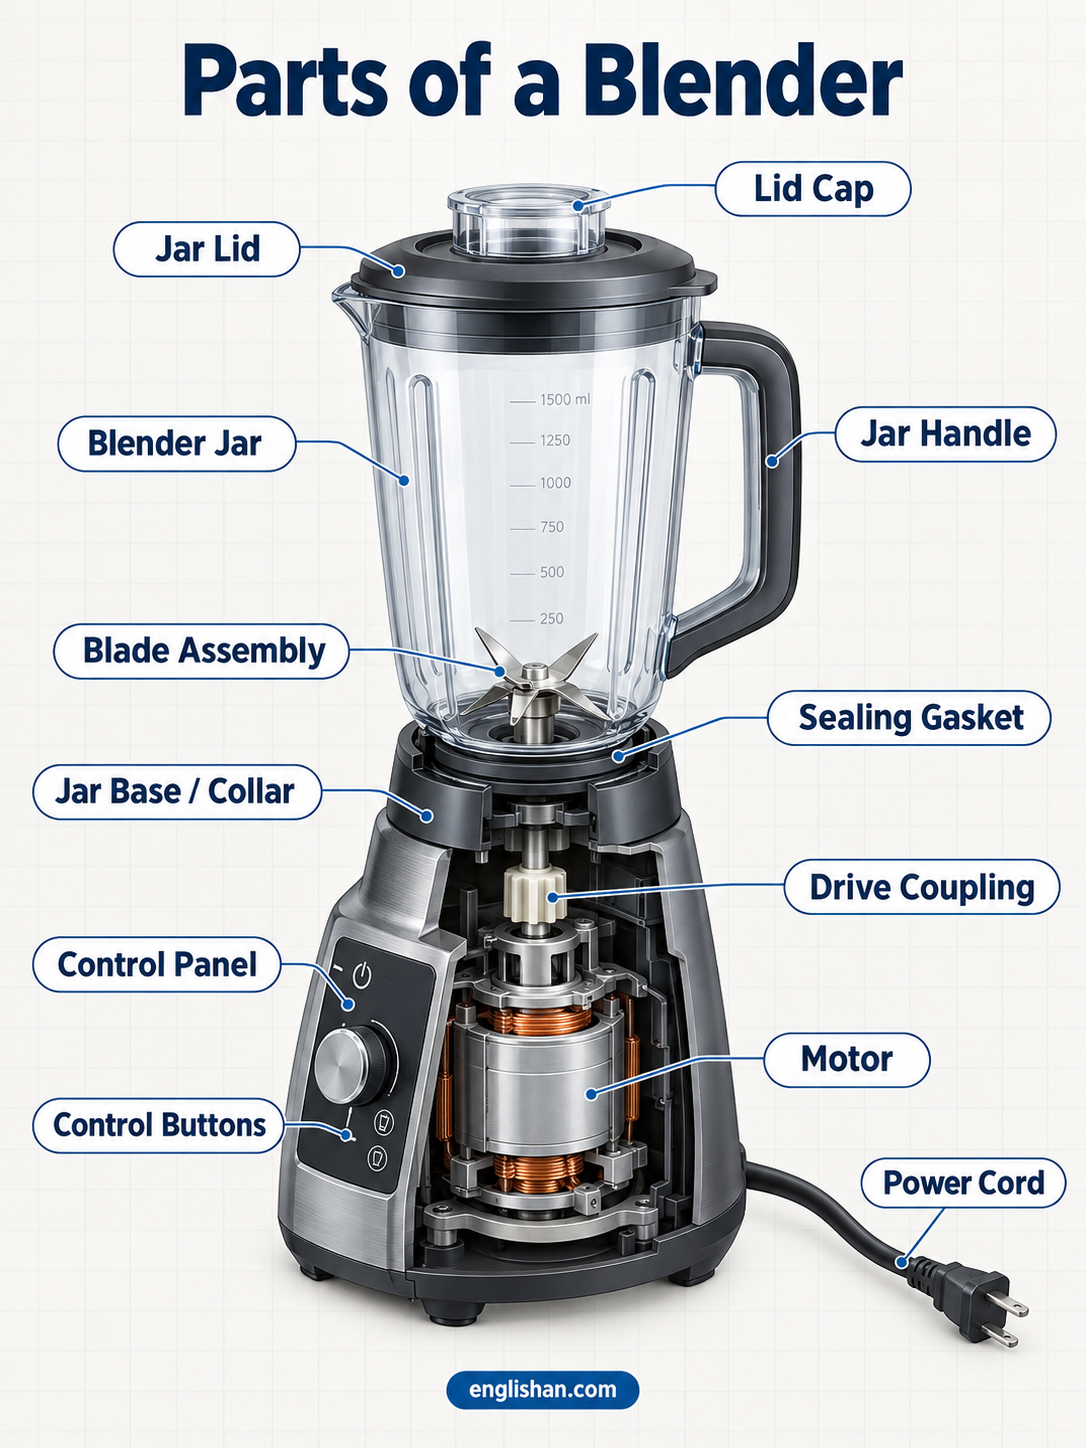
At the top, a lid with a small cap closes the jar. The jar has a handle, a pour spout, and volume markings on its side. The blade assembly is fitted into the jar’s bottom on a gasket and a threaded collar. Under it, a drive socket connects to the motor inside the base, and the control panel and feet are on the base itself. These are the main parts of a blender, from the pieces a cook handles to the motor parts fixed in the base.
| Part | Where you find it |
|---|---|
| 1. Lid | Removable cover on top of the jar |
| 2. Lid cap | Small plug in the center of the lid |
| 3. Tamper | Plastic rod that passes through the lid opening |
| 4. Jar | Tapered container over the base |
| 5. Jar handle | Molded grip on one side of the jar |
| 6. Pour spout | Lip at the top edge of the jar |
| 7. Volume markings | Molded or printed lines on the jar wall |
| 8. Jar ribs | Vertical ridges inside the jar wall |
| 9. Blades | Angled steel arms at the bottom of the jar |
| 10. Blade shaft | Steel rod through the jar floor |
| 11. Bearings | Rings around the shaft inside the blade housing |
| 12. Shaft seal | Rubber ring at the base of the shaft |
| 13. Gasket | Rubber ring between the blade assembly and the jar |
| 14. Jar collar | Threaded ring under the jar |
| 15. Drive coupling | Toothed stud under the blade assembly |
| 16. Base housing | Molded body under the jar |
| 17. Drive socket | Star-shaped insert in the center of the base top |
| 18. Motor | Wound motor inside the base |
| 19. Cooling fan | Small fan at the bottom of the motor |
| 20. Thermal fuse | Safety link near the motor windings |
| 21. Feet | Rubber pads under the base |
| 22. Control panel | Front face of the base |
| 23. Speed dial | Rotary knob or row of buttons on the panel |
| 24. Pulse button | Spring-loaded button on the panel |
| 25. Control board | Circuit board behind the panel |
| 26. Safety interlock | Switch or magnetic sensor under the jar seat |
| 27. Power cord | Cable leaving the back of the base |
Blender Lid Parts
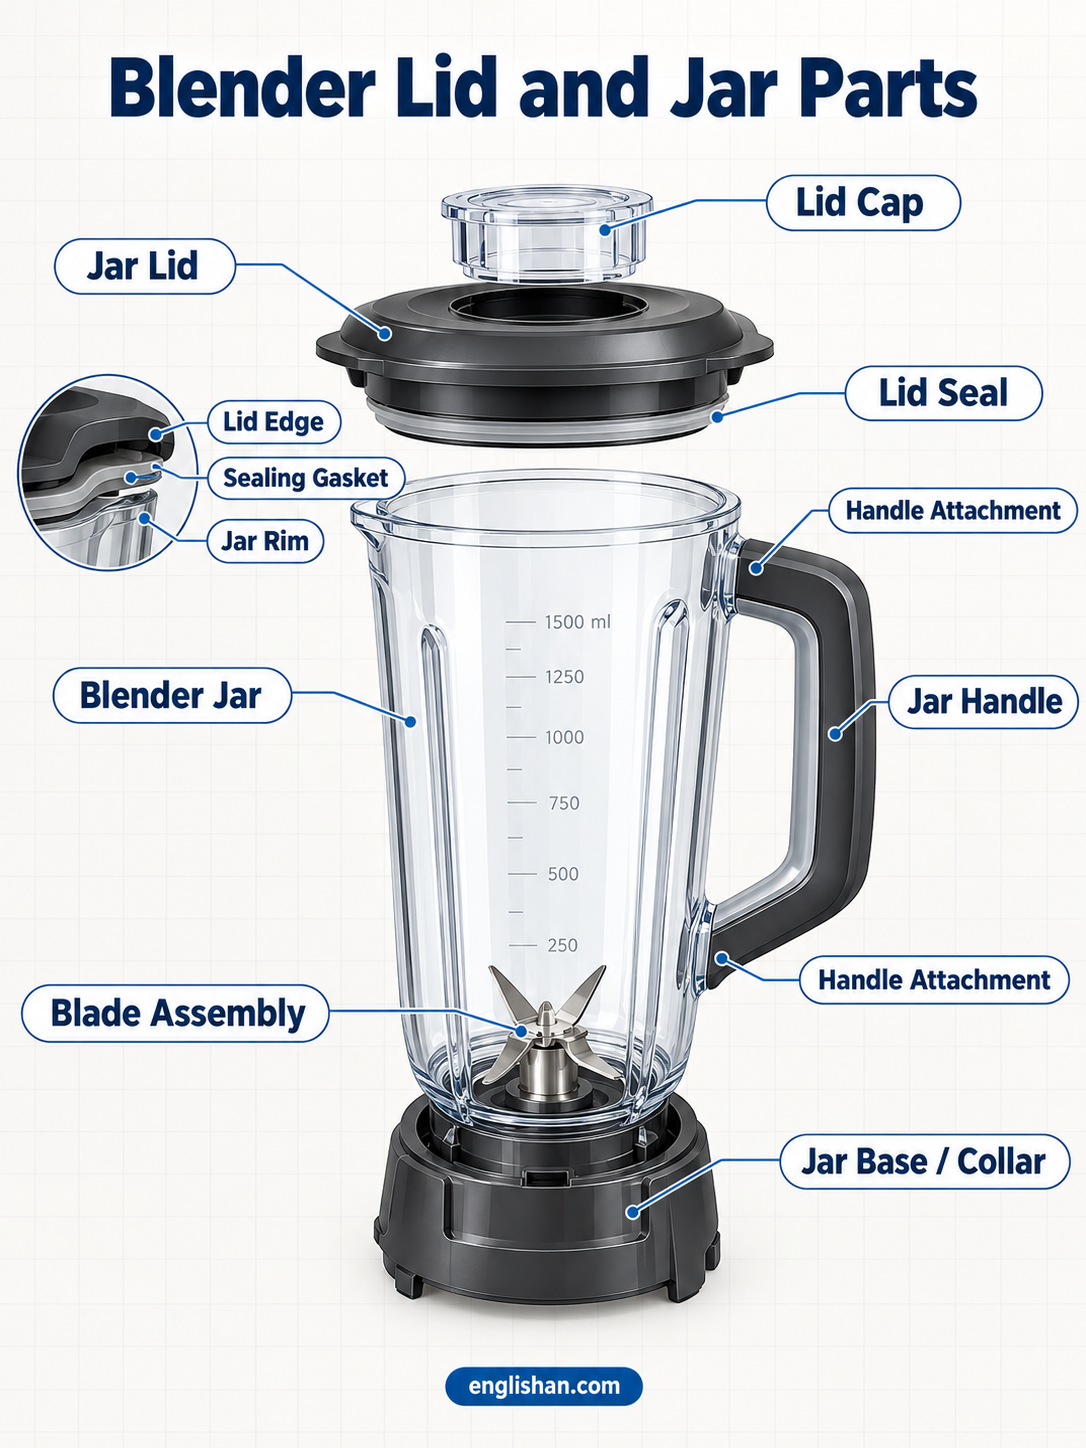
Three of the parts of a blender make up the lid group. All three come off the top of a jar with a 48 to 72 ounce capacity.
Lid
The lid is the top part of a blender. It is a molded plastic cover with a rubber or soft plastic edge that presses into the jar’s rim. Some lids twist and lock, while others snap into place. A center opening, about 1.5 inches across, is cut through its top.
Lid Cap
A small round plug fits the center opening of the lid. That plug is the lid cap, and it lifts out so ingredients drop in. Its top has a finger notch and a ridge around the edge.
Tamper
The tamper is a plastic rod, 10 to 12 inches long, with a flared end and a grip on top. It passes through the lid opening and stops short of the blades. Blenders with a high-wattage motor come with one.
Blender Jar Parts
Five of the parts of a blender belong to the jar itself. It is wider at the top than at the bottom.
Jar
The jar is a tapered container of glass, copolyester plastic, or stainless steel. Makers also call it the pitcher, the carafe, or the container, and on glass models it is the glass part of a blender. Glass is heavy and resists scratches, and copolyester is lighter and shatter resistant. Stainless jars are opaque, so the contents are hidden.
Jar Handle
A molded grip on one side of the jar forms the handle. Plastic jars have it molded in one piece, while glass jars attach it with a metal band. The handle is molded opposite the pour spout.
Pour Spout
The pour spout is a pinched lip at the top edge of the jar, cut wider than the rest of the rim. Its shape directs the flow as the jar tips. Most spouts are on the side opposite the handle.
Volume Markings
Lines molded or printed on the jar wall mark the volume in ounces and in cups, and in milliliters on most jars. The scale runs up the side from the bottom. Printed marks fade in a dishwasher, and molded marks stay.
Jar Ribs
Vertical ridges run up the inside wall of the jar, molded in as flutes or corners. Square jars get the same effect from their flat sides. Ribs break the spin of the contents, so the mixture folds toward the blades.
Blade Assembly Parts
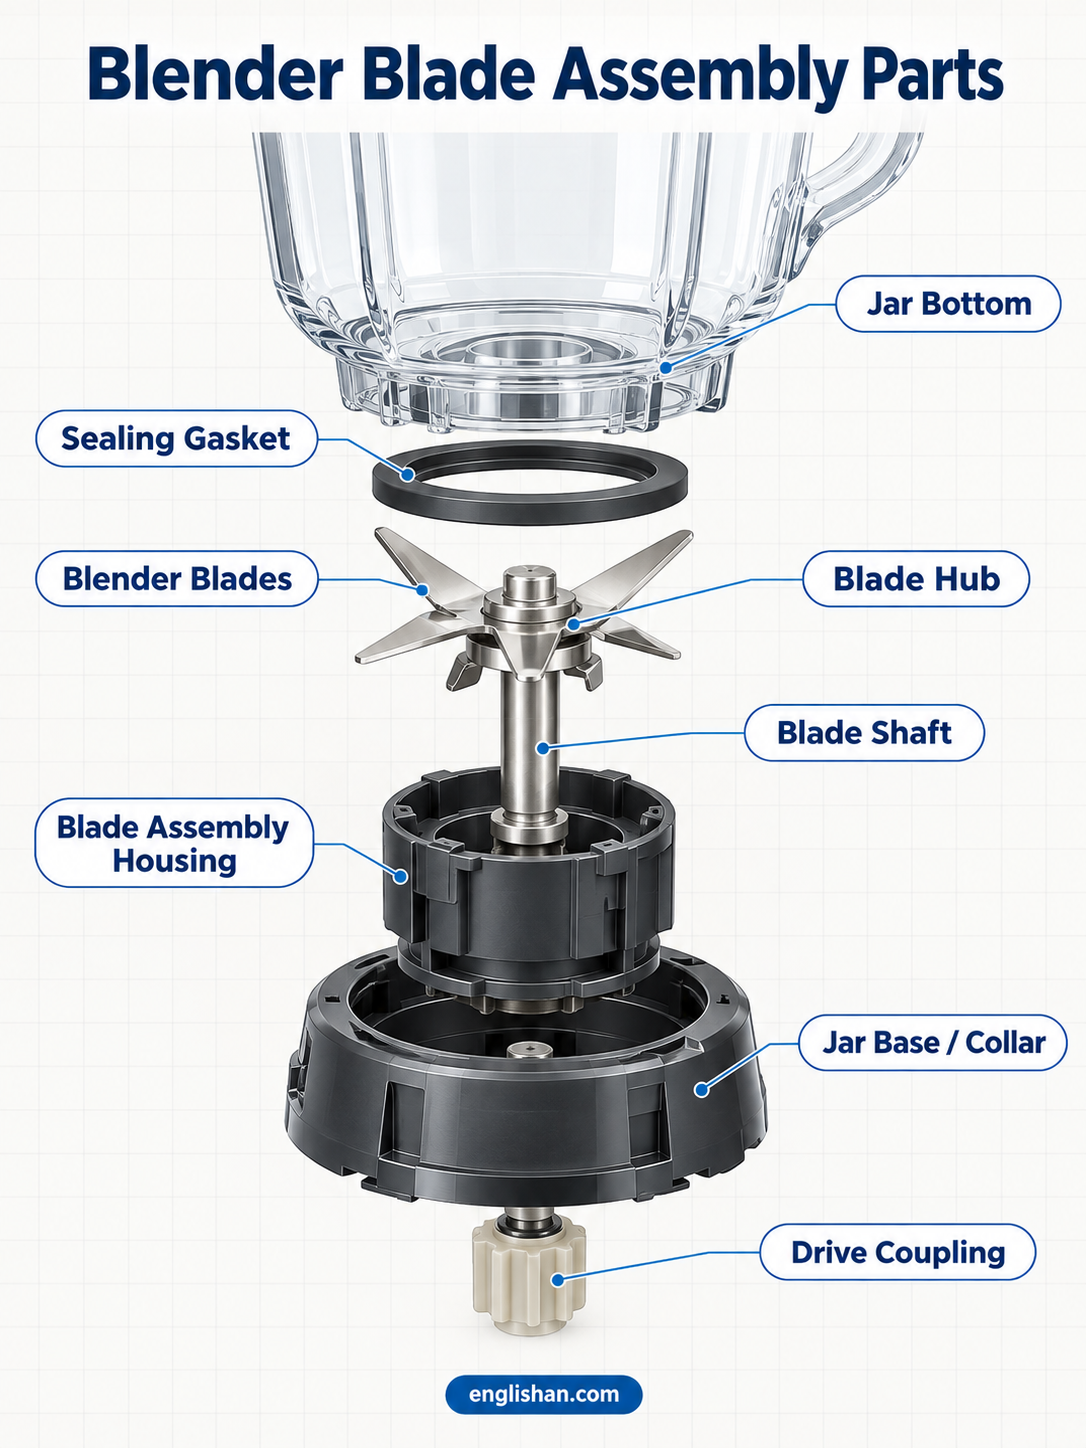
Seven of the parts of a blender are fitted into the bottom of the jar. Together they make up the blade assembly, which unscrews as one unit for cleaning.
Blades
Four to six stainless steel blades are stacked on a hub, bent at different angles, with some pointing up and some down. Household blades have dull edges, since the speed does the cutting. The bottom pair reaches the floor of the jar.
Blade Shaft
The blade shaft is a steel rod that runs from the blade hub down through the jar floor. Its top end is threaded or splined for the blades. At the bottom, it ends in a drive stud.
Bearings
Two small bearings, ball or bronze sleeve, are pressed into the blade housing, one over the other, and the shaft turns inside them. Sealed ball bearings last longer, and sleeve bearings are cheaper and more common in budget models.
Shaft Seal
A rubber or plastic ring called the shaft seal wraps the shaft at the top of the blade housing. Its lip presses against the steel, and a worn seal shows as a drip under the jar.
Gasket
The gasket is a flat or ring-shaped piece of rubber or silicone between the blade assembly and the jar floor. It is gray, white, or black, and it flexes slightly when the jar collar is tightened.
Jar Collar
Threads on the outside of the jar’s bottom take a ring called the jar collar. It is made of plastic or metal, with grooves or lugs around the edge. Tightening it clamps the blade assembly against the gasket.
Drive Coupling
A toothed stud or gear at the bottom of the blade assembly forms the drive coupling. It is molded in plastic or cut in metal, with three or four teeth. It drops into the drive socket on the base.
Blender Base Parts
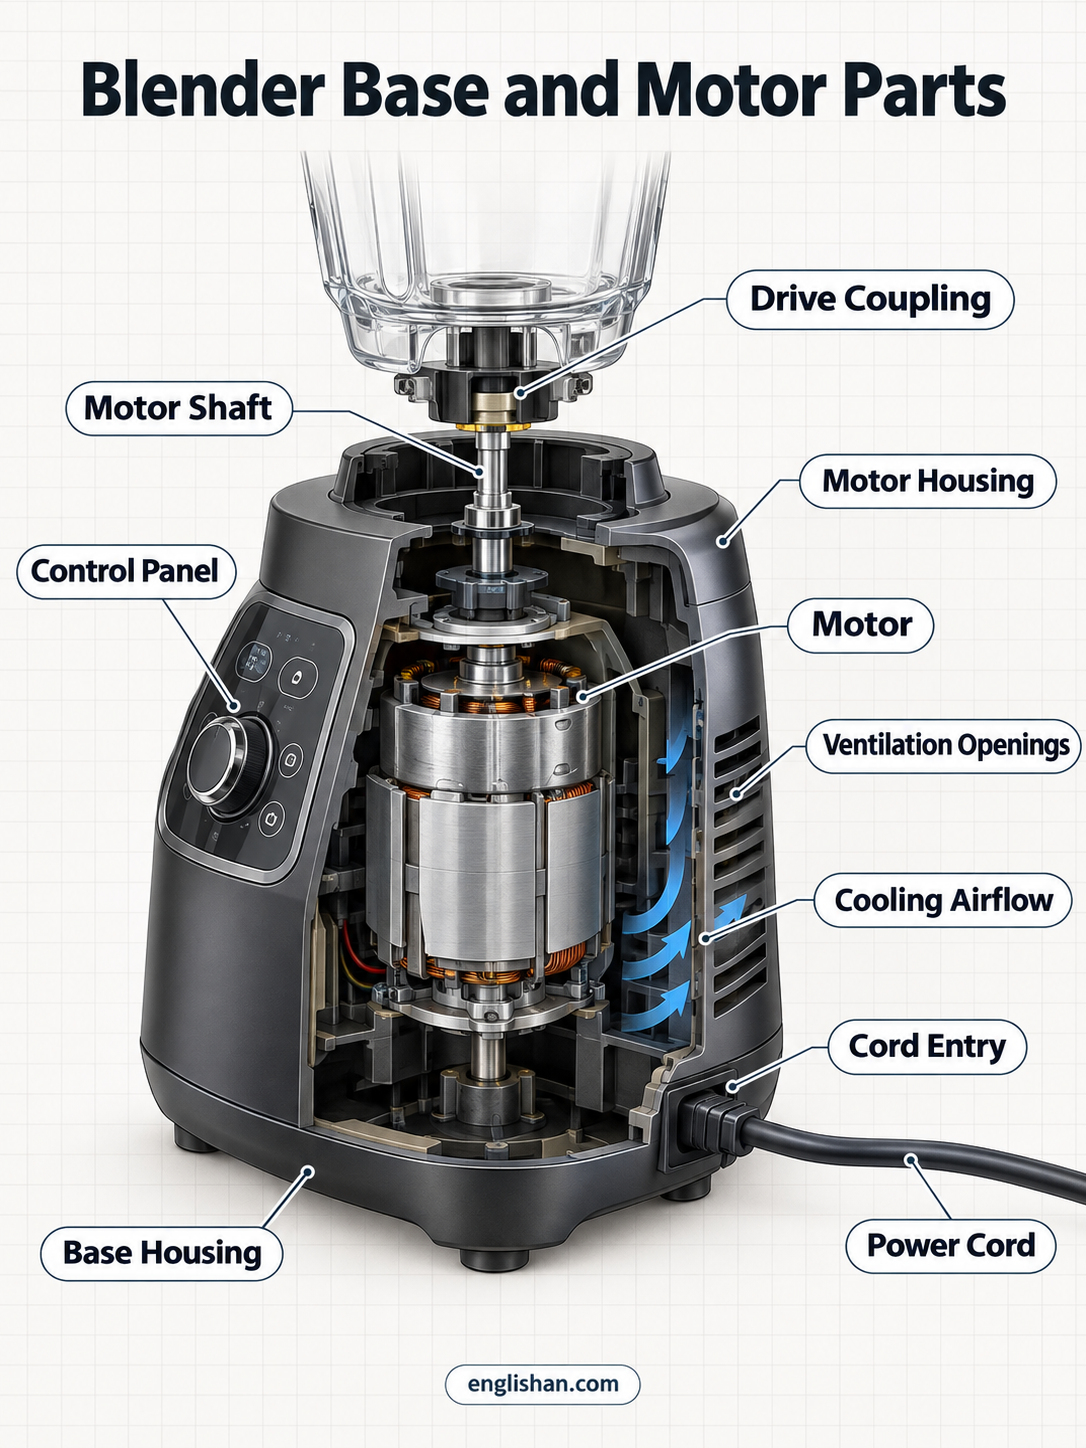
Six of the parts of a blender are fixed in the base, and none of them leaves the housing during washing.
Base Housing
The base housing is the bottom part of a blender. It is a molded shell of plastic, die-cast metal, or stainless steel, wider at the bottom than at the top. Most of the machine’s weight is in the base. A recess in the top of the shell locates the jar.
Drive Socket
In the center of the base top, a star-shaped insert of rubber or plastic forms the drive socket. It has three or four slots that match the coupling’s teeth. Its rubber cushions the connection and wears with use.
Motor
The motor is a brushed universal motor in most household blenders. Its stator is a stack of iron plates wound with copper wire. Its rotor, also called the armature, is a spinning core with a commutator, a ring of copper segments at one end. Two carbon brushes press against that ring. Household motors are rated from about 300 to 1,800 watts.
Cooling Fan
A small plastic fan is fastened to the bottom of the motor shaft. Air enters through intake slots in the underside of the base, passes over the windings, and leaves through vents in the sides.
Thermal Fuse
A thermal fuse is a small metal link wired in series with the motor windings. It is buried in the winding insulation, and if the motor overheats, the link opens and shuts the blender off.
Feet
Three or four rubber or suction feet are fitted under the base. They lift the shell off the counter and leave an air gap for the intake slots. Their pads also grip the surface, so the base does not walk.
Blender Control Parts
Six of the parts of a blender are on the front or the back of the base, or behind the front panel.
Control Panel
The control panel is the front face of the base, molded in plastic or brushed metal. Its knob, buttons, or touch pad are fitted into it. Printed labels show the speeds and the pulse setting.
Speed Dial
The speed dial is a rotary knob or a row of push buttons on the panel. Household models offer 3 to 10 speed steps. A rotary dial turns a small switch, while buttons press onto the control board.
Pulse Button
A spring-loaded button on the panel, the pulse button, runs the motor only while it is pressed. Releasing it returns the button to its rest position. Some panels label it with a lightning bolt.
Control Board
Behind the panel, the control board is a green circuit board with a power triac, small relays, and, on newer models, a microcontroller. A ribbon cable links it to the buttons. Its wires run to the motor and the interlock.
Safety Interlock
A plunger switch or a magnetic sensor under the jar seat forms the safety interlock. The motor will not run unless the jar is seated on the base. Some models add a sensor in the lid.
Power Cord
The power cord leaves through the back of the base and is 3 to 6 feet long. It ends in a two- or three-prong plug for a 120-volt outlet. A rubber strain relief protects it where it meets the shell.
FAQs
Q1. What are the parts of a blender called?
The different parts of a blender are the lid, lid cap, tamper, jar, and blade assembly, plus the base with its motor. The jar has a handle, a pour spout, and volume markings. The base has the control panel, the speed dial, the pulse button, and the feet.
Q2. What are the parts of a blender and their functions?
The lid and cap close the jar, and the jar contains the ingredients. The blades cut them, and the gasket and shaft seal stop leaks. The motor spins the blades through the coupling, and the speed dial and pulse button control it.
Q3. What is the glass part of a blender called?
The glass part of a blender is called the jar, and some makers call it the pitcher or the carafe. It is a tapered container with a handle, a pour spout, and volume markings. Plastic and stainless steel jars share the same shape.
Q4. What is the top part of a blender called, and what is the bottom part?
The top part is the lid, with a lid cap in its center opening, and the bottom part is the base. The base is the housing that contains the motor, the drive socket, and the controls. The jar and the blade assembly fit between the two.
Q5. What are the parts of a blender motor?
A blender motor has a stator of iron plates wound with copper wire, plus a rotor with a commutator and two carbon brushes. A cooling fan is fastened to the bottom of the shaft. A thermal fuse is wired into the windings, and a drive socket on the base top links the motor to the blade assembly.
Q6. What are the parts of a hand blender or stick blender?
A hand blender, also called an immersion or stick blender, has a motor body with a switch and a long shaft. A bell-shaped blade guard and a blade are at the tip. A power cord runs from the top of the motor body, and cordless models fit a battery there. It has no jar, no base, and no gasket.
Q7. What are the internal parts of a blender?
The internal parts of a blender are the blades, shaft, bearings, and shaft seal inside the blade housing. The motor, cooling fan, thermal fuse, and control board are inside the base. Vertical ribs are the only internal part of the jar itself.
You May Also Like